TL;DR
RV air conditioners fail mostly from dirt. Dirty filters cut airflow over the evaporator. Dirty condenser coils prevent heat rejection. Together they make the compressor run hot, hard, and short-lived. Twice-a-year cleaning, monthly filter checks, and a few habits will keep a $1,200 rooftop unit running for a decade instead of replacing it at year four.
The single most common RV repair we hear about from friends and consulting clients isn't the slide, the roof, or the fridge. It's the rooftop air conditioner. Specifically, the rooftop air conditioner that worked fine last season and now blows lukewarm air, freezes up, or trips its breaker. The bill for an AC replacement on a typical mid-size trailer is $1,000–$1,800 installed. The bill for the maintenance that would have prevented it is $0 and an hour of your time.
We had our first RV AC die at three years old in a 102-degree weekend in Texas. Nothing as inconvenient as an AC that can't keep up when you need it most. After that one we read the manuals. After our second rig we built the routine. Now we get full service life out of our rooftop units — and the savings on replacement over the years pays for everything else we spend on maintenance combined.
How an RV AC actually works
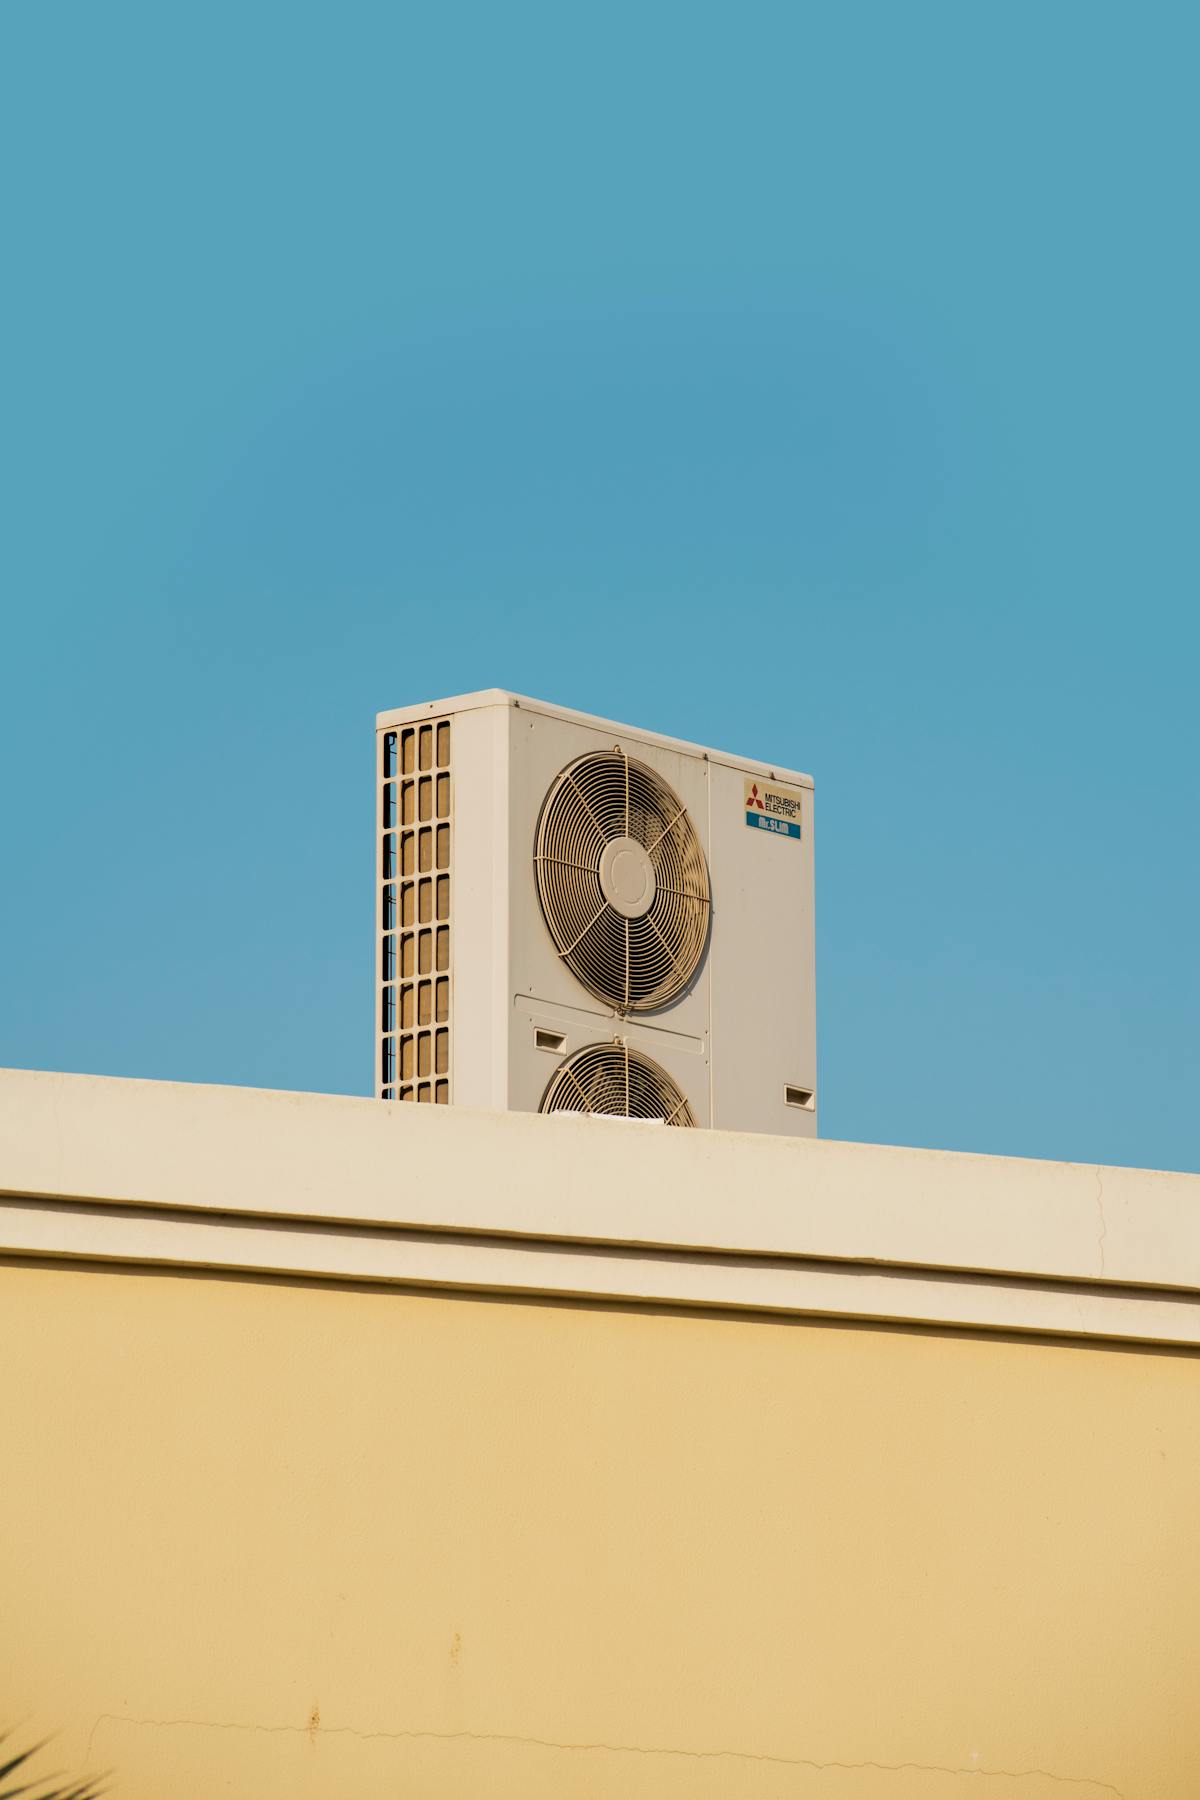
A brief refresher, because understanding the system makes the maintenance make sense. A rooftop RV air conditioner is a small, compact vapor-compression system, mechanically identical to a residential window unit or central AC.
- The compressor pressurizes refrigerant gas, which heats it.
- The hot pressurized gas flows through the condenser coil on top (the rooftop side, exposed to outside air).
- A fan blows outside air across the condenser, cooling the refrigerant and condensing it to a liquid.
- The liquid refrigerant flows through an expansion device into the evaporator coil on the bottom (the inside side, exposed to interior air).
- The refrigerant expands and absorbs heat from the interior air blowing across it. The air comes out cold; the refrigerant turns back into gas.
- Cycle repeats.
Two things in that cycle have to work or the whole system fails:
- The condenser has to reject heat. If outside airflow is restricted or the coil is fouled, the refrigerant doesn't fully condense, and the compressor works harder against rising pressure. It overheats. It eventually dies.
- The evaporator has to absorb heat. If inside airflow is restricted (dirty filter) or the coil is iced over, the refrigerant doesn't fully evaporate, and liquid refrigerant returns to the compressor, which is also bad.
Most RV AC failures trace to one or both of these. Both are preventable with basic cleaning.
Habit 1: Filter replacement
The easiest task in RV maintenance. The interior return air filter on a rooftop AC is usually accessible from inside the rig — pop the ceiling assembly cover and the filter is right there. Some units have a foam filter that washes; some have a paper or non-woven filter that replaces.
How often: monthly during heavy use, every 2-3 months during light use, every time it visibly looks dirty.
Procedure: pop the cover, pull the filter, vacuum or rinse (if reusable), reinstall. Takes two minutes. Costs nothing if it's reusable, or a few dollars per filter if it's not.
Why it matters: a dirty filter restricts airflow over the evaporator, drops indoor heat absorption, and at the extreme allows ice to build up on the coil. An iced evaporator is the most common reason an RV AC stops cooling. The fix is to turn it off, let the ice melt (an hour or two), and address the underlying restriction. The underlying restriction is almost always a dirty filter.
Habit 2: Condenser coil cleaning (annually, minimum)
This is the high-leverage one. The condenser coil on top of the rooftop unit gets exposed to whatever blows through the air for the life of the rig. Pollen, dust, cottonwood fluff, bug carcasses, leaves, road grit from highway miles. All of it accumulates on the coil fins. Each layer reduces airflow and heat rejection capacity.
By year three, a never-cleaned condenser is often half-clogged. The AC still cools, but the compressor is working much harder than it should. By year five, the compressor is failing and the owner thinks they need a new AC. They needed a vacuum cleaner.
The procedure:
- Power down. Disconnect the rig from shore power AND turn off the breaker on the AC if separately switched.
- Climb up to the roof. If your roof isn't walkable, set a ladder.
- Remove the plastic shroud. Usually four screws around the perimeter of the unit. Save them; they tend to vibrate loose over time and you'll want to replace any that are damaged.
- Lift the shroud off carefully. Most are made of UV-degraded plastic that gets brittle with age. Take pictures of where everything goes if it's your first time.
- Inspect the condenser coil. This is the metal fin assembly on top of the unit, with a fan blade in the middle.
- Vacuum loose debris. A shop vac with a brush attachment is ideal. Vacuum gently — the fins bend easily.
- Clean the coil. A no-rinse coil cleaner (sold at HVAC supply houses; some auto parts stores carry it) sprayed on, allowed to dwell, and then optionally rinsed. Read the product label. Don't use household degreasers — they damage the aluminum fins.
- Straighten bent fins if you can. A fin comb (a few dollars at HVAC supply) gently aligns bent fins to restore airflow.
- Inspect everything else under the shroud while you have it off. Wire connections, fan blade balance, anything that looks unusual.
- Inspect the rooftop gasket. This is the rubber seal between the AC unit and the roof opening. Cracks or compression failure here lead to water intrusion into the rig.
- Reinstall shroud. Snug screws, don't overtighten — the plastic strips easily.
- Restore power, run the unit for 15-30 minutes, and verify normal operation.
- Log the work.
First time you do this, an hour. By the third time, 30 minutes. Once a year, every year. This single task is, in our experience, the difference between an RV AC that lasts 4 years and one that lasts 12.
The honest version
The plastic shrouds on RV ACs get extremely brittle from UV exposure. Year-six shrouds crumble when you remove them. Have a roll of UV-rated electrical tape and a few spare fasteners on hand; expect minor cosmetic damage during the cleaning. The replacement shroud is $50-150 and easy to source if yours is past saving.
Habit 3: Evaporator coil and pan
The evaporator side, accessed from inside the rig, also needs occasional attention. The same dirt that accumulates on the condenser also accumulates on the evaporator. The condensate water that drips off the cold coil also drains through a pan and a drain line that can clog.
The procedure:
- Power down.
- Remove the interior ceiling assembly cover. Usually pulls down with a few latches or screws.
- Vacuum the evaporator coil gently.
- Inspect the condensate pan for debris and standing water. Clean as needed.
- Check the drain line / weep holes for blockage. Sometimes a small wire can clear them; sometimes a quick vacuum at the rooftop side.
- Reassemble.
This is a less critical task than the condenser cleaning but worth doing annually. A clogged condensate drain can produce indoor water dripping that owners often mistake for a roof leak.
Habit 4: Gasket inspection
Between the AC unit and the roof opening, there's a thick foam-rubber gasket that's compressed by the four large mounting bolts going through the ceiling into the roof. That gasket is what keeps water out.
Over time, the gasket compresses, dries out, and stops sealing. The mounting bolts also can loosen from vibration. The result is a slow water intrusion that often shows up as a stain on the ceiling around the AC opening before any other symptom.
Once a year (we do it during the shroud-off cleaning):
- Inspect the visible gasket from the rooftop side.
- Check the four AC mounting bolt torques (from inside the rig, accessing the cover ring under the ceiling). The torque spec is in your AC manual; over-tightening compresses the gasket too much and accelerates failure.
- If the gasket is visibly aged or you see ceiling staining around the unit, replacement is a real maintenance task. The procedure involves removing the AC unit (it's heavy — 80-100 lbs), replacing the gasket, and reinstalling. Most RV techs handle this in an hour or two.
Gasket failure is the most common source of "I thought my roof was leaking but it's actually the AC" troubleshooting. A $25 gasket prevents a several-thousand-dollar ceiling repair.
The component manufacturers
Most rooftop RV ACs are built by a small number of manufacturers — Dometic, Furrion, RecPro, Coleman-Mach (now part of Airxcel), and a few smaller players. The basic design is similar across all of them; the parts and procedures vary slightly. Their service portals are the best source of unit-specific information.
Bookmark the one for your unit. Their service manuals are usually freely available and far more detailed than your RV's owner's manual.
Operating habits that extend life
How you run the AC also matters. A few habits:
- Don't power-cycle rapidly. If you've just shut the AC off, give it 5 minutes before turning it back on. Compressors don't like rapid cycling.
- Pre-cool when you can. Run the AC when ambient is moderate to get the rig down to temperature before peak heat hits. Maintaining is much easier than recovering.
- Close windows and vents. Obvious, but worth saying. An AC fighting against open vents runs constantly and never wins.
- Use awnings and reflectix. Cutting solar gain dramatically reduces AC duty cycle.
- Manage interior heat loads. Don't bake at peak heat; don't shower with the bathroom fan venting cooled air outside; turn off lights you're not using.
- Run the fan continuously, not on auto, in humid climates. Continuous fan reduces short-cycling and helps the unit dehumidify.
- Don't run a 30A rig on a 15A residential outlet expecting AC to work properly. Low voltage from undersized circuits hurts the compressor.
- Use a surge protector with low-voltage cutoff. Voltage sags below ~104V during heavy AC operation will damage the compressor. We have a whole post on RV surge protectors and EMS.
Voltage matters more than people think. Mike Sokol's RV Electricity articles have detailed material on how brownout conditions kill AC compressors. Worth reading if you camp at older parks with marginal pedestals.
When you have two AC units
Larger RVs often have two rooftop ACs. Care is identical, just doubled. A few additional considerations:
- Both units need annual cleaning. Don't do one and skip the other.
- The two units often share the same condensate management; check both drain lines.
- If you have a "soft start" or capacitor-boost add-on for running both on 30A, the device needs occasional inspection too.
- The two units may use different filter sizes. Check yours.
Heat pump variants
Some rooftop ACs include a heat-pump function for shoulder-season heating. Maintenance is the same; the unit is just doing the cycle in reverse half the time. One added attention point: heat-pump operation in very cold weather is hard on compressors, and most units have a temperature cutout below ~40°F outdoor. Don't override it.
Diagnosing common problems
Not cooling — fans run, no cold air
- Capacitor failure (the most common AC failure after dirt). The starting capacitor is a $20 part; replacement is straightforward but requires care with stored electrical charge.
- Low refrigerant (rare in a sealed system; usually means a leak, which is a tech job).
- Compressor failure (the expensive one). Often the result of years of running with dirty coils.
Freezing up
- Dirty filter. Replace.
- Low fan speed. Check fan motor.
- Low refrigerant (tech).
- Running with cold ambient outdoor temps the unit isn't designed for.
Trips the breaker
- Compressor drawing too much current — could be voltage sag, could be a starting issue, could be compressor on its way out.
- Loose connection somewhere in the AC's wiring.
- Mismatched breaker (rare, but worth verifying).
Water dripping inside
- Clogged condensate drain. Clear it.
- Gasket failure between unit and roof. Inspect, replace if needed.
- Rig not level enough for proper drainage. Some rooftop units are sensitive to slope.
Noisy operation
- Loose shroud (most common — vibration loosens screws).
- Fan blade out of balance.
- Loose internal component.
- Bearing failure in the fan motor.
Most of the above can be diagnosed and fixed by an attentive owner. Refrigerant work, compressor replacement, and any deeper electrical fault is tech territory. The RV Technical Institute directory and NRVIA directory are good starting points.
Cost math
To make the case one more time:
- Annual condenser cleaning: $0 in supplies the first year (vacuum and coil cleaner if you don't have them — $30), $0 in subsequent years. One hour annually.
- Filter replacement: $10-20 a year for non-reusable; $0 for washable.
- Gasket replacement when needed: ~$25 for the gasket, 1-2 hours for a tech.
- Capacitor replacement when one fails: ~$20 part, 30 minutes if DIY.
- Whole-unit replacement: $1,000-1,800 depending on size and installer.
- Ceiling water damage from a failed gasket discovered late: $1,500-5,000+.
One hour a year. Two filters a year. That's the whole investment. The alternative is paying for new ACs every 3-5 years instead of every 10-15.
When you're shopping: AC red flags
If you're inspecting a used RV, the AC tells you a lot about the previous owner's maintenance habits.
- Climb up to the roof. Remove the shroud. Look at the condenser coil. Filthy = neglected unit.
- Run the AC for 15-20 minutes during the inspection. Verify cooling output (a temperature drop of 18-22°F between intake and supply is healthy).
- Look for ceiling staining around the AC interior cover ring — that's a gasket-failure tell.
- Listen for unusual noise.
- Check the model number against the build sheet — some sellers swap in a cheaper unit when the original failed.
What this means for you
Pull the filter today. Schedule the annual rooftop service for spring or fall. Buy a vacuum brush attachment if you don't have one. Use a surge protector with low-voltage cutoff. Watch for ceiling staining. Don't power-cycle. Don't run from undersized circuits. When you do hire a tech, ask whether they checked the gasket — most don't, automatically.
RV air conditioners are not finicky. They're tough little vapor-compression systems built to run hard for thousands of hours. They fail because they sit in dust and nobody cleans them. The good news is that this is one of the most fixable problems in RV ownership. Five minutes a month, an hour a year. That's the cost of an AC that lasts a decade.
Good Luck Out There!