TL;DR
Spend 30 minutes walking the rig with a checklist before you walk into the office. Roof, seals, slides, plumbing, electrical, tires, frame, smells. You don't need tools and you don't need expertise — you need to be present and willing to look. If the dealership won't let you do this, that is itself the answer.
When we bought our first new RV — a Coachmen Pursuit, back when our first kid was a toddler and we were vibrating with excitement — we spent about six minutes looking at it before we said yes. We sat in the cab. We bounced on the bed. We loved the kitchen layout. We did not climb on the roof, look under the slide gaskets, smell the bathroom, or check the date codes on the tires. We did everything in our hearts and nothing with our hands. The bill for that, over the next two years, was substantial.
This is the inspection we should have done. It is not a substitute for an independent RV inspector — and we absolutely think you should hire one before you sign on anything new or used. But by the time you have an inspector booked, you've usually already narrowed down to one or two units. This is the inspection that gets you to that narrowing. Thirty minutes, anybody can do it, no special tools required.

What to bring
The whole point of this inspection is that you don't need anything fancy. Here's the kit:
- A bright flashlight. Your phone's flashlight is fine, but a real flashlight with throw is better. Most defects hide in shadows.
- Your phone for photos. Document everything. Even if you buy this unit, the photos are baseline for warranty disputes later.
- A small notebook. Or notes app. Write down what you see in order. Memory is unreliable when you're standing inside a brand-new floor plan.
- A small folding step stool if you have one, or be ready to ask for a ladder. You're going on the roof.
- Comfortable shoes you can crouch in. You'll be on your knees a lot.
- A second person if at all possible. One inside, one outside, to test slides, lights, and water flow.
That's it. No moisture meter, no thermal camera, no scoping tool. Those are for the professional. You are doing the gross-defect screening — the things any human can see, smell, or feel, if they're paying attention.
Minute 0–5: First impression and the smell test
Walk in. Stop. Breathe. Don't say anything. Don't sit down. Just stand inside the door and use your nose for a full minute.
What you're checking for:
- Mustiness or any hint of mildew. A new RV should smell new. A used RV should smell clean. Either one that smells faintly damp is telling you something — typically that there's been water somewhere there shouldn't have been. Check under sinks, behind toilets, under slide-out seals, around the roof vents.
- Strong air freshener. Lots of strong air freshener is a tell. Dealers sometimes use it to cover up storage smell — which is fine — but they sometimes also use it to cover up smells that aren't fine. If the cabin smells like a perfume counter, walk through it for two more minutes after the door's open. The base smell shows up eventually.
- Sewer or holding tank smell. Even on a unit that's never been used. A faint sewer smell on a new unit can mean improperly installed P-traps, missing vent caps, or a dry holding tank seal. None are deal breakers, but all are worth flagging.
Then, while you're still standing in the doorway, look at the floor. Is it level? RVs on dealer lots aren't always perfectly leveled, but a floor that visibly slopes is worth understanding. Walk the whole floor next. Feel for soft spots, especially in the kitchen, the entry, and around the slides. A soft spot in the floor of a new RV is not normal. A soft spot in a used RV is a serious bargaining point — sometimes a serious dealbreaker.
Minute 5–12: The roof
The roof is the most expensive thing on an RV and the most often neglected. It's also where the majority of "the unit was fine when we sold it" disputes originate, because most buyers never went up there. Go up there.
Ask for a ladder. If the salesperson hesitates, explain politely that you'd like to look at the roof before you sign. A good dealership will produce a ladder within five minutes. A bad one will tell you the roof is fine. The roof is not always fine.
The honest version
If a dealer outright refuses to let you on the roof of a unit you're seriously considering, you have your answer. There's nothing on a properly maintained roof anyone needs to hide. We'd treat this single refusal as a reason to leave.
Once you're up there, here's what you're looking for:
- Sealant condition around every penetration. The vents, the AC, the antenna mount, the skylight, the front and back caps, the slide tops. Sealant should look smooth, continuous, and white-ish (not yellow, not cracked, not pulling away). Cracked or peeling sealant is the most common defect on RV roofs and the most common cause of interior water damage. The RV Technical Institute teaches a six-month sealant inspection cadence for owners — and we'll write a separate post on how to do that inspection yourself.
- The membrane itself. Most RV roofs are TPO or EPDM rubber. Look for soft spots, blisters, tears, scuffs, or chalk-white patches that wipe off as a powder. Walk gently. If the roof feels spongy under your weight, the decking underneath has likely absorbed moisture. That's a major repair.
- Trim and corner caps. Look at where the side walls meet the roof. The corner moldings should be flush, sealed continuously, and not pulling away.
- Solar wiring and accessories. If the unit has factory or aftermarket solar, look at how those wires enter the roof. A clean entry has a labeled gland and a smooth sealant ring. A bad one has tape and silicone.
Photograph the roof end-to-end. Even if the unit looks great. This is your baseline.
Minute 12–18: Seams, slide seals, and the underbelly
Climb down. Walk slowly around the entire perimeter of the unit. You're looking at every visible seam — the side wall edges, the slide-out boxes, the entry door, the cargo bays, the front and rear caps.
Things that should make you stop and photograph:
- Sealant that's pulling away from a corner.
- Any waviness in the side wall, which can indicate delamination — the fiberglass exterior separating from the wood substrate behind it. Run your hand along the wall. It should be flat and consistent. Run your eye along it at a low angle — waves in the reflection are the most reliable tell.
- Stress cracks in the gel coat or paint near corners and around windows.
- Brown or rust-colored streaking under windows, vents, or trim. That's water history, even on a unit the dealer says is "brand new from the factory" (and yes, that happens).
- Slide-out seals that are torn, cracked, dry, or pulling away from the slide box. Push gently on the seal with your finger. It should feel like a rubber gasket — supple, slightly tacky. A dried-out seal is a leak waiting to happen. Slides take some real punishment, and we have a separate post on slide-out maintenance for after you buy.
Now look underneath. Most RVs have a vinyl or coroplast underbelly that protects the plumbing and insulation. Look for:
- Tears, sags, or panels coming loose.
- Staining or dripping anywhere. There shouldn't be any.
- Tape repairs. Tape is the universal sign that someone fixed something the cheap way.
- Tank and frame condition. Frame rails should be clean and straight. Surface rust on the bare metal is normal; flaking or scaling is not.
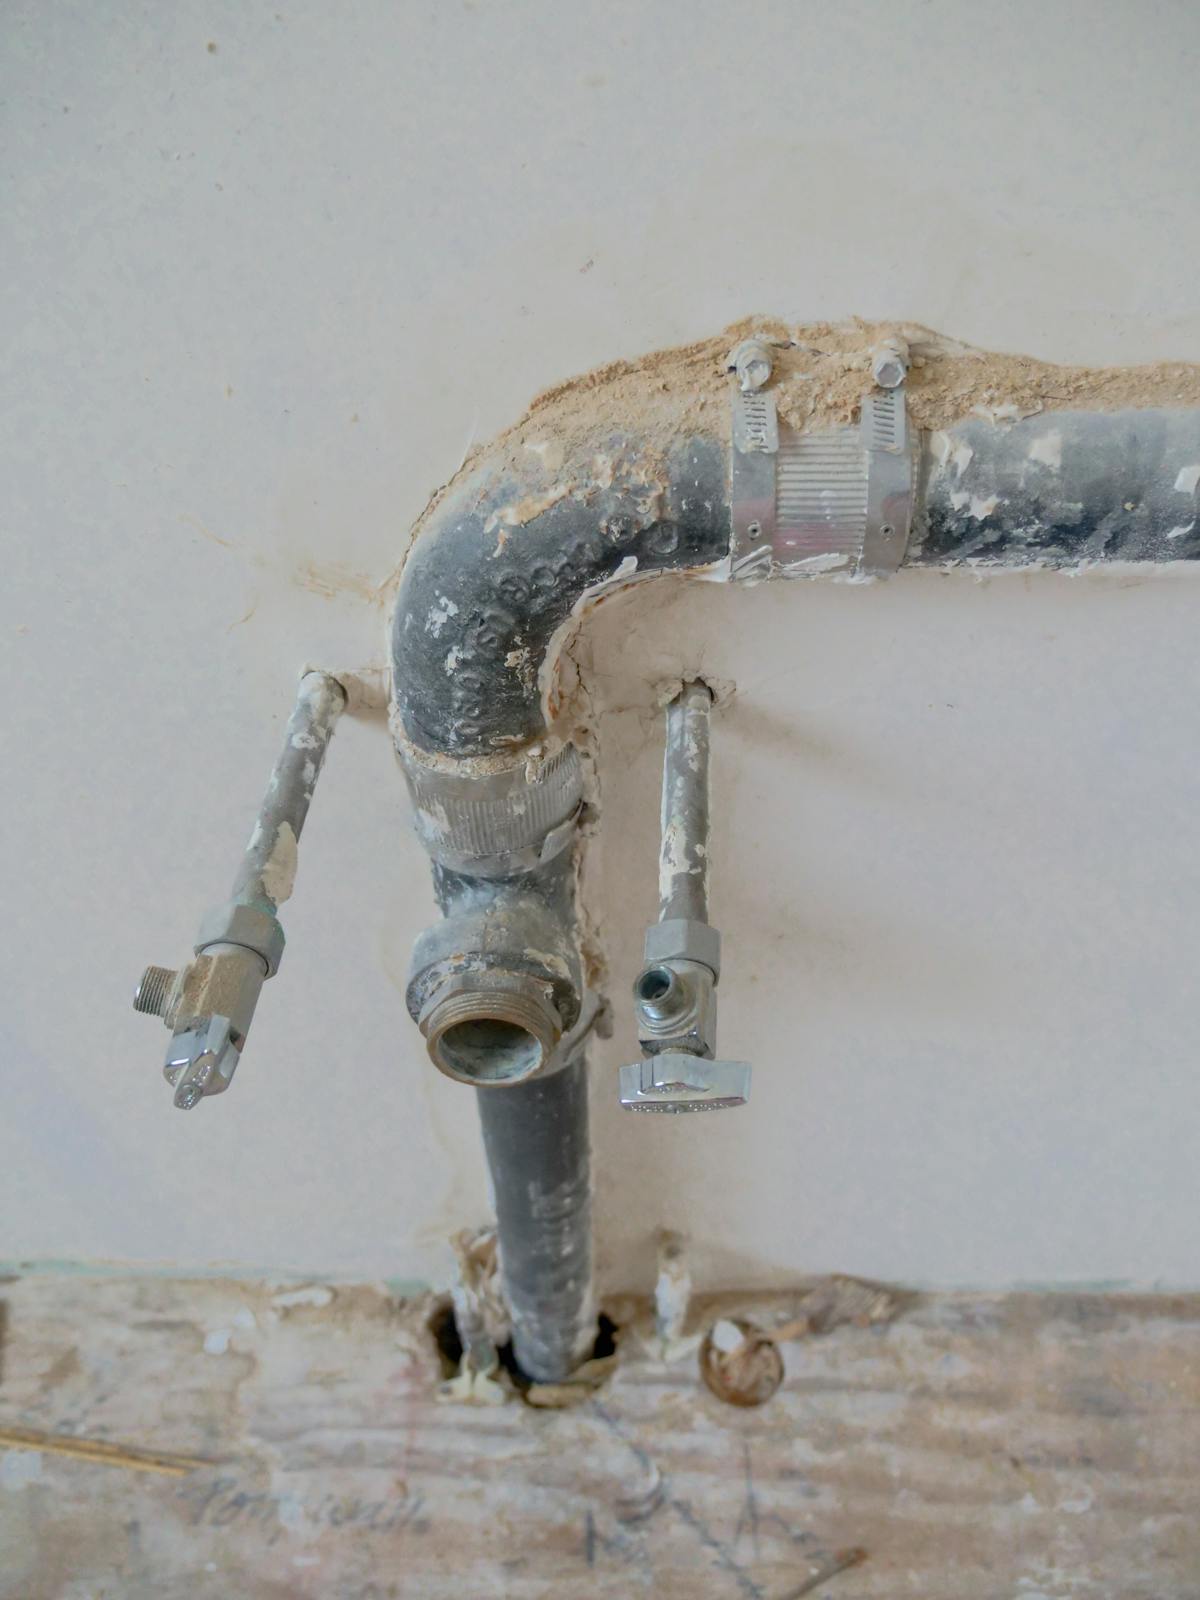
Minute 18–22: Plumbing and water
Ask the salesperson to put water in the system if it isn't already. With city water hooked up (or the fresh tank filled and pump running), do this:
- Run every faucet. Hot and cold. Check for steady flow, no sputtering. Air in the lines is normal on a freshly filled system; persistent sputtering after a minute is not.
- Flush every toilet. Listen for the water seal holding (no constant trickle in the bowl after flush). Check that the foot pedal works smoothly.
- Run the shower. Look at the door seal and check the floor pan for cracks.
- Open every cabinet under every sink. Bring your flashlight. Look for moisture, staining, fittings that look hand-sealed with too much sealant, hose clamps that aren't quite right. New plumbing should look factory-clean.
- Check the water heater area. Open the access panel. Look for staining or moisture around the heater itself.
Then ask the salesperson to demonstrate the black tank flush, the gray valves, and (if equipped) the macerator. You don't need to operate them — you need to see they work, and that the panels and valves don't show signs of leaking, sweating, or corrosion.
Minute 22–26: Electrical and appliances
Now turn things on. Lots of things, at once if you can.
- Every light. Interior, exterior, awning, marker lights. Count the dead ones. A new RV with three dead lights is sloppy prep, not destiny — but it tells you about the prep team.
- The AC. Run it on cool for at least five minutes. Listen for vibration, clicking, or labor. Feel the air at the vent — it should drop temperature noticeably within 90 seconds.
- The furnace. Even in summer. Cycle it on briefly. It should ignite and blow heat within a couple of minutes. A furnace that won't ignite at the dealership won't ignite at the campground.
- The fridge. Whether it runs on propane, electric, or both — turn it on, and check both modes. The cooling unit is the single most expensive appliance to replace. Our RV refrigerator failures post covers the most common failure patterns.
- The microwave, the TV, the entertainment system. All of it. If the unit has a power awning, an electric jack, or auto-leveling, run them.
- Outlets. Bring a cheap outlet tester if you have one (the three-light kind, $6 at any hardware store). Check every outlet. Many of the issues we found on our own rigs were miswired outlets that no one caught at the factory or at the dealer.
Open the breaker panel. Look at the labels. Look at the wiring. It should look neat. If it looks like someone's hobby project, that's worth a flag.
Minute 26–28: Tires, frame, and propane
Tires age out long before they wear out, especially on RVs that sit for months at a time. Look at the sidewall of every tire and find the four-digit DOT date code (it's at the end of the "DOT" stamp). The first two digits are the week of manufacture, the second two are the year. A 2024 tire is showing "XX24." A tire older than five years from purchase is generally considered past its safe service life regardless of tread, because RV tires fail from sidewall cracking and UV exposure long before they wear out. We have a much deeper post on RV tire age vs. tread.
On a "new" unit, you'd expect tires that match the build year. If the unit was built two years ago and has been sitting on the lot, the tires might already be older than they look. This is a legitimate negotiation point.
Check the propane tanks. They should be within their certification window (look at the date stamp), free of dents and rust, and properly secured. Smell for propane around the regulator. Any persistent smell of gas — even a little — is a stop.
Minute 28–30: Inside details and the close
You're almost done. Last sweep:
- Open and close every cabinet door and drawer. Catches that don't latch on day one will not magically improve.
- Open every window. Latches, screens, seals.
- Sit on the bed. Sit on the couch. Lie down. If anything's broken-feeling in the frame underneath, you'll feel it.
- Look at the floor in the entry, the slide track edges, and under the dinette. If there are little debris piles, paint chips, or sawdust, that's a tell about how clean the prep was.
- Take one last whole-cabin photo and one last whole-exterior photo. Time-stamped.
Step outside. Take a breath. Now you have a list. Now you can have an informed conversation.
What to do with what you found
You will find things. Every new RV has things; every used RV definitely has things. The list is not for the trash. It's for the negotiation.
- Group the items by severity. Cosmetic issues (a scuffed cabinet, a dead light bulb) are pre-delivery prep work — write them on the buyer's order as "to be corrected before delivery." A reasonable dealer will agree without much discussion.
- Structural or system issues (soft floor, delamination, persistent smell, dead appliance, failed test) are different. These are either pre-delivery repairs with documentation, price concessions, or reasons to walk to a different unit.
- Tire age is a clean negotiating point. New tires before delivery are a perfectly reasonable ask on a unit with old date codes.
- Anything you're not sure about goes on the list for the independent inspector. That's why you don't sign yet.
Refer back to our 10 questions to ask before signing for the conversation framework — the inspection findings feed directly into the questions about prep sheets, PDI process, and what the dealer is willing to commit to in writing.
What you can't catch (and why you still hire a pro)
This 30-minute walk-around will catch a huge chunk of the visible defects on a typical RV. It will not catch:
- Hidden moisture inside walls or under floors. That takes a moisture meter and someone who knows where to probe.
- Frame and axle alignment. Some defects only show up under load or on a level surface with a measuring tool.
- Propane system pressure tests. Sniffing for a leak only catches the worst leaks. A pressure test catches them all.
- Roof membrane condition under sealant. Sealant can hide a lot.
- Generator hours, oil condition, and load testing.
- Electrical system load testing. A real inspector pulls 30A and 50A under load and watches voltage.
This is why, especially for any purchase over about $30,000 — and absolutely for any used unit — we recommend a certified inspector from the NRVIA. They charge $400–$900 depending on the unit, and they regularly find issues that pay for themselves several times over. We have a dedicated post on when to hire an RV inspector and what it costs.
If the dealer won't let you do this
Some won't. We've heard "we don't allow customers on the roof for liability reasons" enough times to know it's a script. The liability reason isn't real — if it were, no one would be allowed up there. The real reason is they don't want you up there. We treat that as the answer to the inspection question we didn't have to ask.
You don't have to be confrontational about it. You can simply say "okay, thank you" and go look at the unit at another dealer who'll let you. There are plenty of dealers who will. The ones who do tend, in our experience, to be the same ones who do better in every other dimension as well.
What this means for you
An hour from now, with a flashlight and a notebook, you can know more about a specific RV than 90% of buyers ever do. You won't catch everything. You'll catch enough to keep yourself out of the most preventable purchases — the ones where the regret starts before the trip home.
If you're trying to evaluate a specific unit and you'd like help thinking through what you found, that's exactly what our pre-purchase consulting is for. We've been on the wrong side of "we should have looked closer" twice. We don't want anyone reading this to make that three.
Take your time, take your flashlight, and: Good luck out there!