TL;DR
De-winterizing isn't hard, but the order matters. Flush antifreeze first, then sanitize the fresh tank with a bleach solution (one ounce per gallon of tank capacity, mixed with water before going in), then pressure-test the system before you trust it. Most spring failures show up at fittings that froze even after winterization, and the smart move is to look for them on purpose, not stumble into them.
Spring de-winterization is a ritual we run every year, and even after seven years of doing it we still find something that needs attention. Last spring it was a hairline crack in a hot-water line fitting under the kitchen sink — caught early because we pressure-tested before connecting to city water. The spring before that it was a cracked low-point drain valve. The first time we did this, on our very first Winnebago, we didn't pressure-test first, hooked up to city water, and discovered the bathroom faucet had a frozen-split body. Spent the morning mopping up.
The good news is that none of this is hard. The procedure is forgiving, the chemistry is mild, and the tools are minimal. The bad news is that almost every RV owner we know got their de-winterization training from a single hurried orientation at delivery, and then improvised from there. So they miss steps. Or they skip the sanitization. Or they use the wrong bleach ratio and end up with a tank full of barely-treated water for the season. This post is the version we wish someone had handed us in 2017.
Before you start: what to gather
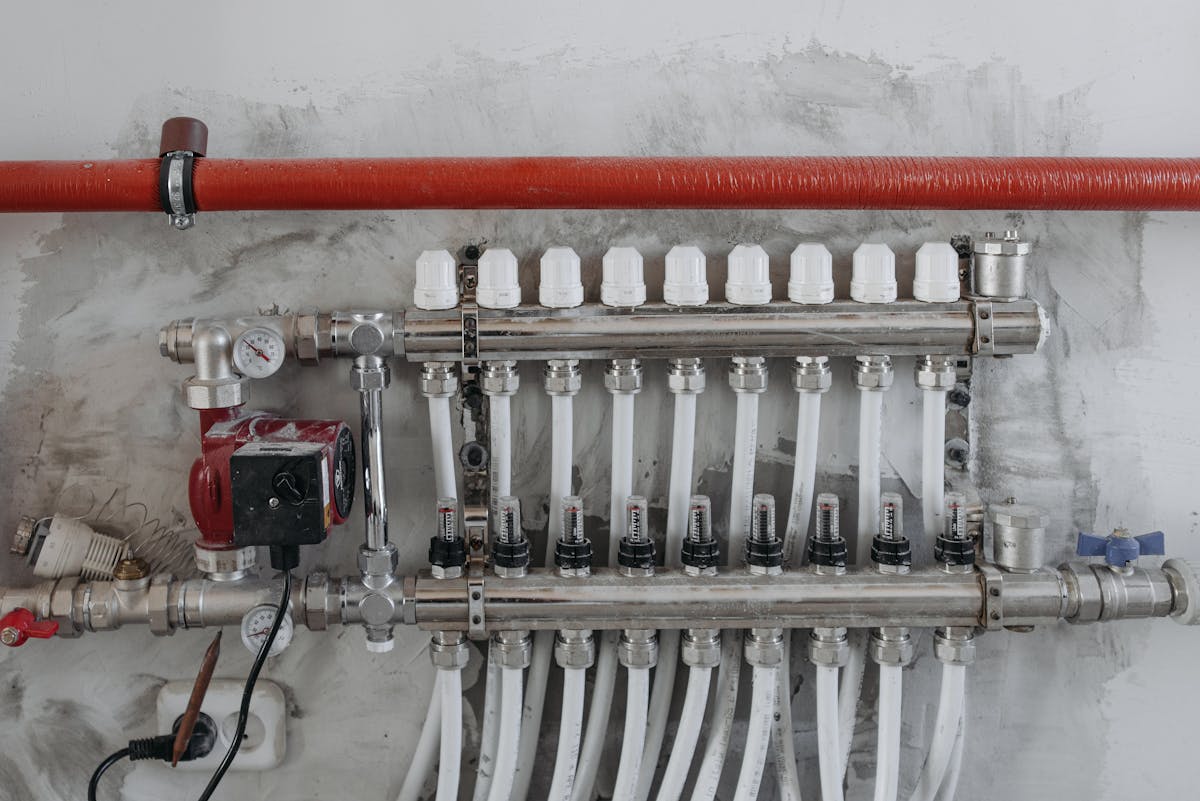
You'll do this faster if you have everything ready before you turn on the pump. Our spring kit:
- A fresh drinking-water hose (a dedicated white potable-water hose, not your garden hose).
- Inline water filter, replaced annually.
- Water pressure regulator. Always. Not optional.
- Household chlorine bleach, plain unscented, not splashless or fragrance-added.
- A measuring cup or jug.
- A bucket.
- A bottle of water-system sanitizer if you prefer a packaged product, though plain bleach at the right ratio works fine.
- Flashlight, paper towels, the maintenance log notebook.
- If you've got a pressure-test gauge or a city-water pressure regulator with a built-in gauge, that's a bonus.
It also helps to do this on a day with mild weather. Not the first warm day of spring when there's still risk of a hard freeze overnight; not the hottest week of summer when standing in the sun gets old fast.
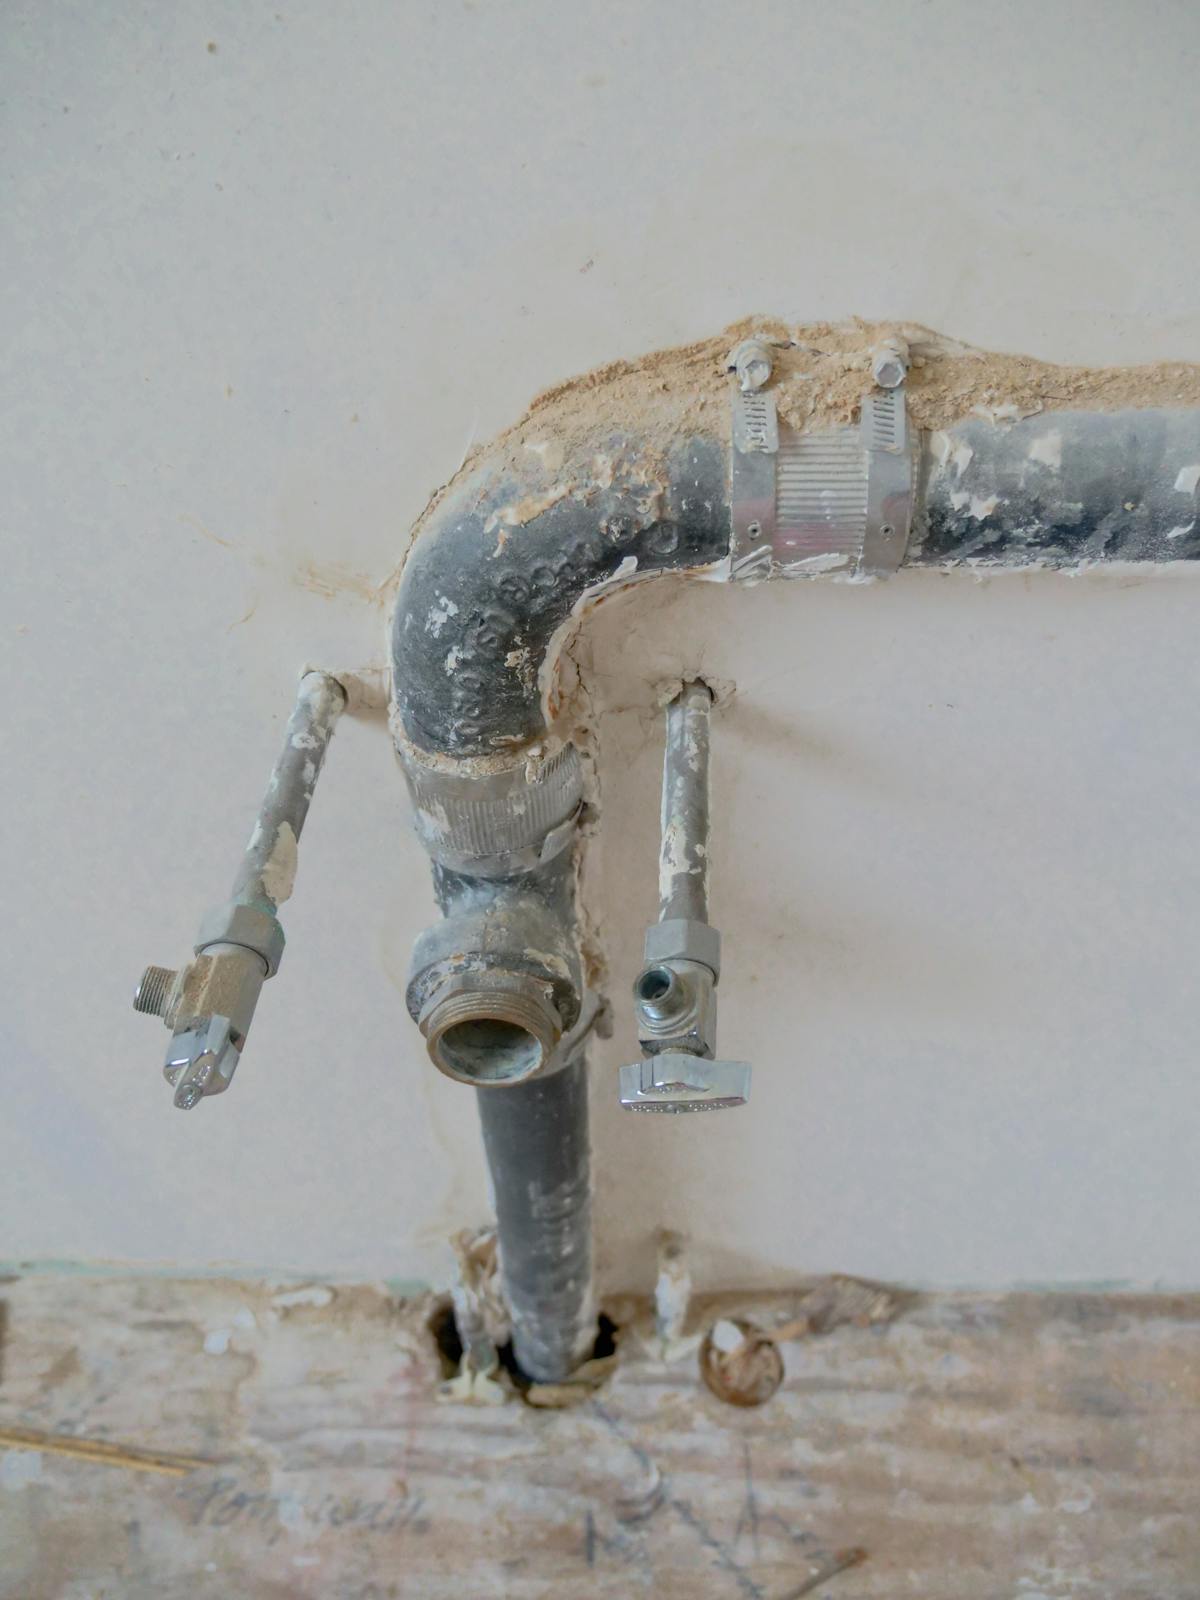
Step 1: Inspect before you flush
Open the water bay. Open the panels under sinks. Crawl into the basement compartments where the water pump and lines live. You're looking for the obvious stuff:
- Cracked fittings. PEX fittings, brass connectors, drain valves — anything that froze and split shows up as a hairline crack or a deformed shape.
- Loose lines. PEX clips that came undone, hoses that slipped off barbs.
- Stains or residues. White crusty deposits around a fitting often mean it was leaking late last season; pink residue from RV antifreeze is normal but excessive pooling means somewhere drained where it shouldn't have.
- Anything that looks new since you put the rig away.
This is also a good time to confirm the orientation of every valve you'll touch in the next steps. Water heater bypass valve in the bypass position? Low-point drains closed? Tank drain valves closed? Fresh tank fill cap on? You're about to put water and pressure into a system that was empty all winter. Knowing the valve state up front prevents the kind of stupid mistakes we've all made (pouring fresh water out the low-point drain because we forgot to close it).
Step 2: Flush the antifreeze
If you winterized with non-toxic pink RV antifreeze (propylene glycol-based, marketed for RV plumbing), it's mild and water-soluble. The goal is to flush it out completely so you're not drinking it or tasting it for the first three weeks of the season.
- Confirm the water heater bypass is still in the bypass position. You don't want antifreeze flushing into the water heater tank, and you don't want fresh water entering the tank until you've inspected it.
- Open the fresh tank fill and add 15-20 gallons of fresh water. (Not the city water inlet — fresh tank fill, so the water pump sees it.)
- Turn on the water pump. Let it pressurize.
- Open the kitchen faucet on cold. Run it until the water runs clear (no pink tint), not just clearer. Several minutes per faucet.
- Switch to hot. Same thing — until clear.
- Repeat at every fixture in the rig: bathroom sink (hot and cold), shower (hot and cold), outside shower if you have one, toilet, washer-dryer hookups if equipped, and any other fixture (ice maker line, dishwasher line, fresh water from the fridge dispenser if your unit has one).
- Flush the toilet until it runs clear.
- Don't forget the low-point drains if your rig has a flush procedure that uses them — most don't, but check your owner's manual.
You'll go through more water than you expect. That's fine. Pink stuff lingers — give every line enough time to run completely clear, not just "mostly clear."
The honest version
Some people skip the antifreeze flush and just sanitize first. We don't. The sanitization step uses chlorine, and you don't want a chemistry experiment with residual antifreeze. Flush first, then sanitize.
Step 3: Take the water heater out of bypass
Once the antifreeze is flushed from the cold and hot lines (with bypass engaged, hot water came from the cold line crossing over, not from the heater itself), it's time to bring the water heater back online.
- Confirm the heater is OFF (both electric element and gas, if equipped).
- Confirm the drain plug or anode rod is installed and tight. (You did pull and inspect it during winterization, right? If you've got a Suburban heater with a sacrificial anode, this is also when you'd install a fresh anode if it's annual rotation.)
- Move the bypass valves back to "normal" position. Most units have either a single three-way valve or a pair of valves; the labels are usually clear, but if you're unsure, check your owner's manual — wrong position can either prevent the heater from filling or send hot water backwards into the cold line.
- Open the pressure relief valve on the heater itself (or open a hot-water faucet) so air can escape as the tank fills.
- Pressurize the system again (pump or city water).
- Watch and wait. The tank takes a few minutes to fill from empty. When water runs out the pressure relief valve (or the open faucet), the tank is full. Close the valve.
- Do not turn the heater on yet. Filling the tank first, then heating, is non-negotiable. A dry-fired heater element will fail in seconds.
Once the tank is full and you've verified no leaks at the connections, you can turn the heater on for the first time and verify it heats normally.
Step 4: Sanitize the fresh water system
This is the step people get most wrong. The standard ratio is one ounce of plain unscented chlorine bleach per gallon of fresh water tank capacity. Note: not directly into the tank — diluted first.
- Calculate. If your tank holds 50 gallons, that's 50 ounces of bleach. (Roughly six cups — a 121-ounce bottle would be more than enough.)
- Pre-dilute. Pour your measured bleach into a bucket of water (at least a gallon). This is for safety and to keep undiluted bleach off your hands, your fittings, and the bottom of the tank.
- Empty the fresh water tank to mostly empty. A few gallons left is fine.
- Pour the diluted bleach solution into the tank via the fill opening. A funnel helps.
- Top up the fresh tank with potable water. The full tank now contains roughly the right chlorine concentration.
- Run the water pump. Open every faucet on both hot and cold until you smell chlorine at each one. Then close. Toilet, washer line, ice maker line, outside shower — all of them.
- Let the system sit, full of chlorinated water, for at least four hours. Overnight is better. Twelve hours is the standard recommendation.
- After the soak, drain the tank completely. Open all faucets and let the lines drain.
- Refill with fresh water. Flush every faucet until you cannot smell or taste chlorine anymore. This usually takes 2-3 tank refills.
Yes, this is tedious. Yes, you do it once a year and you do it right. The alternative is biofilm and waterborne bacteria in your potable system. The plumbing is opaque; you cannot see what's growing in it. The sanitization cycle resets the system.
If you'd rather use a commercial product (Camco, Thetford, and others make packaged RV water-system sanitizers), follow the package directions exactly. The active ingredients are similar to dilute bleach; the convenience is the measurement.
Step 5: Pressure-test before trusting it
This is the step most owners skip and the one that has saved us money the most often.
After sanitization and re-flushing, before you go camping, before you trust the system: pressurize it and check every fitting for leaks. You can do this two ways.
Method A: pump only. Close all faucets. Turn on the pump. The pump will run until the system reaches its cut-off pressure (usually 40-55 psi), then click off. Now walk the rig. Listen. Check under every sink, every fitting you can access, the water heater connections, the water pump itself. The pump should not cycle on again for at least several minutes if the system is sealed. If it cycles repeatedly with no faucet open, you have a leak somewhere. Find it before you go anywhere.
Method B: city water with regulator. Hook up to a city water connection through a quality regulator. City pressure (with regulator) typically delivers 45-55 psi. Same walkthrough — listen, check every fitting, look for drips. City pressure is steady; if a fitting is going to weep, it'll show now.
If you find a leak, fix it before moving on. PEX fittings are usually a matter of re-crimping or replacing a clamp. Compression fittings on a faucet usually need a tighter twist or a new washer. Anything more involved — a cracked PEX line, a split fitting body — is straightforward but requires a few specific tools. We'll do PEX crimping ourselves; we won't do solvent-weld plumbing without certainty.
Common spring failures we look for
If a system was going to fail over winter, it usually fails at predictable spots. Here's our checklist of "look here first" places:
- Low-point drain valves. Plastic valves crack from freeze pressure or UV. Inexpensive to replace; easy to miss until you turn on the pump and water pours out a basement compartment.
- Outdoor shower fittings. Often the last item to drain during winterization and the first to freeze if any water lingered.
- Toilet supply line and valve. Especially Thetford and Dometic-style cassette systems where a small water reservoir near the bowl can hold residual fluid.
- Water filter housing. If you have an inline filter, the housing and O-ring can crack from freeze.
- Water pump body. Less common but not rare. Pumps that were drained imperfectly can crack the diaphragm housing.
- Washer-dryer connections. Often forgotten in winterization, often the first to fail.
- Ice maker line. The skinny line to the fridge ice maker freezes easily and is hard to fully drain.
- Slide-out fixtures. Some rigs have water lines running into slides; the joint where the line crosses the slide seal is a freeze risk.
Walking these spots before you go anywhere is 10 minutes you'll be glad to have spent.
Step 6: Water heater anode rod (Suburban units)
If your rig has a Suburban water heater (steel tank with a sacrificial anode rod), spring is when you replace it. The rod corrodes throughout the season; replacing it annually keeps the tank from corroding instead. Our annual maintenance checklist covers the cadence; this is the time to do it.
Atwood/Dometic heaters use an aluminum tank that doesn't take an anode. You'll still want to flush sediment from the tank annually — a flush wand on a garden hose, threaded into the drain plug opening, with the tank open and drained, takes 10 minutes and prolongs life. Confirm which type you have before you go shopping for parts.
Step 7: Test, log, close out
Before you call it done:
- Run hot water at every fixture for 60 seconds. Confirm temperature.
- Flush the toilet 5-10 times. Confirm the seal holds (the bowl should retain a little water at the bottom).
- Test the water pump at every faucet from cold-start.
- Test city water at every faucet.
- Confirm the water heater operates on both gas and electric if equipped.
- Log the date, the bleach amount you used, anything you found and fixed.
This is a 2-3 hour exercise the first time you do it. By year three or four it's an hour, plus the four-hour bleach soak. We do ours over a Saturday morning while we work on other annual items.
What if you didn't winterize and the rig sat outdoors?
This happens. Life gets busy, the rig stays in the driveway, and winter sneaks up. If you suspect freeze damage in a system that wasn't properly winterized:
- Don't pressurize and find out the hard way.
- Do a slow pump test — bring the system up to pressure with the pump and listen carefully for hissing or dripping anywhere.
- If the pump never reaches cutoff pressure, you have a major leak somewhere — find it before you put another drop in.
- Check every fitting in the basement compartments under flashlight.
- Check the water heater drain plug area for a swollen tank or cracked welds (rare but possible with severe freeze).
- If you find a cracked PEX line, replace the affected section. PEX repair is not difficult but does require a crimper or a SharkBite-style connector.
- If you find anything that involves removing and replacing a tank or major component, it's tech territory.
Freeze damage that goes undetected and then gets put into service can flood interior compartments. Slow is fast here.
Quality of water on the road
One more topic worth covering: the water going into your tank matters as much as the cleanliness of the tank itself.
- Use a dedicated potable-water hose. White or labeled "drinking water safe." Garden hoses contain plasticizers that leach into water and taste terrible.
- Use an inline carbon filter at the fill connection. Replaces yearly.
- Use a pressure regulator at every connection. Always. Some city water systems run pressures that will burst PEX fittings.
- If you fill from questionable sources (older campgrounds, rural sites, unfamiliar water), consider running a finer filter at the kitchen faucet.
- For full-timers, an under-sink filter for drinking water at the galley is a worthwhile $80–150 upgrade.
Bad water destroys water heater elements, fouls fixtures, and tastes terrible. The filters and regulator are some of the cheapest gear in your toolkit and they prevent the most common spring problems.
What this means for you
Block a Saturday morning. Run the steps in order: inspect, flush antifreeze, take heater out of bypass, sanitize, pressure-test, fix anything you find, log the work. Don't skip the sanitization. Don't skip the pressure test. Replace the anode if you have a Suburban tank. Re-stock the bleach for next year while you're thinking about it.
An RV water system, treated well, is reliable for decades. Treated poorly, it's the source of half the inconvenience and a lot of the indoor water damage we see on the road. The spring de-winterization is the day that resets the whole system for the year. It deserves a few hours.
Good Luck Out There!